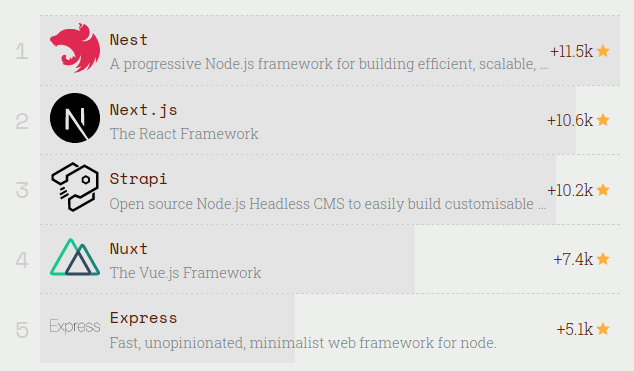
NestJS is a framework for building Node.js applications. It is somewhat opinionated and forces us to follow its vision of how an application should look like to some extent. That might be viewed as a good thing that helps us to keep consistency across our application and forces us to follow good practices.
NestJS uses Express.js under the hood by default. If you’re familiar with my
TypeScript Express series
and you’ve enjoyed it, there is a great chance you will like NestJS too. Also, knowledge of the Express framework will come in handy.
According to Risingstars
, Nest is the fastest-growing Node.js technology in terms of stars on Github in 2019
An important note is that the
documentation of NestJS
is comprehensive, and you would benefit from looking it up. Here, we attempt to put the knowledge in order, but we also sometimes link to the official docs. We also refer to the Express framework to highlight the advantages of using NestJS. To benefit from this article more, some experience with Express might be useful, but not necessary.
If you want to look into the core of Node.js, I recommend checking out the
Node.js TypeScript series
. It covers topics such as streams, event loop, multiple processes and multithreading with worker threads. Also, knowing how to create an API without any frameworks such as Express and NestJS makes us apprieciate them even more.
Getting started with NestJS
The most straightforward way of getting started is to clone the official TypeScript starter repository. Nest is built with TypeScript and fully supports it. You could use JavaScript instead, but here we focus on TypeScript.
A thing worth looking into in the above repository is the
tsconfig
.
json
file. I highly recommend adding the
alwaysStrict
and
noImplicitAny
options
The above repository contains the most basic packages. We also get the fundamental types of files to get us started, so let’s review them.
All of the code from this series can be found in
this repository
. Hopefully, it can later serve as a NestJS boilerplate with some built-in features. It is a fork of an official
typescript-starter
. Feel free to give both of them a star.
Controllers
Controllers handle incoming requests and return responses to the client. The
typescript
-
starter
repository contains our first controller. Let’s create a more robust one:
posts.controller.ts
1
2
3
4
5
6
7
8
9
10
11
12
13
14
15
16
17
18
19
20
21
22
23
24
25
26
27
28
29
30
31
32
33
34
35
36
import
{
Body
,
Controller
,
Delete
,
Get
,
Param
,
Post
,
Put
}
from
'@nestjs/common'
;
import
PostsService
from
'./posts.service'
;
import
CreatePostDto
from
'./dto/createPost.dto'
;
import
UpdatePostDto
from
'./dto/updatePost.dto'
;
@
Controller
(
'posts'
)
export
default
class
PostsController
{
constructor
(
private
readonly
postsService
:
PostsService
)
{
}
@
Get
(
)
getAllPosts
(
)
{
return
this
.
postsService
.
getAllPosts
(
)
;
}
@
Get
(
':id'
)
getPostById
(
@
Param
(
'id'
)
id
:
string
)
{
return
this
.
postsService
.
getPostById
(
Number
(
id
)
)
;
}
@
Post
(
)
async
createPost
(
@
Body
(
)
post
:
CreatePostDto
)
{
return
this
.
postsService
.
createPost
(
post
)
;
}
@
Put
(
':id'
)
async
replacePost
(
@
Param
(
'id'
)
id
:
string
,
@
Body
(
)
post
:
UpdatePostDto
)
{
return
this
.
postsService
.
replacePost
(
Number
(
id
)
,
post
)
;
this
.
postsService
.
deletePost
(
Number
(
id
)
)
;
}
}
The first thing that we can notice is that NestJS uses decorators a lot. To mark a class to be a controller, we use the
@
Controller
(
)
decorator. We pass an optional argument to it. It acts as a path prefix to all of the routes within the controller.
Routing
The next set of decorators connected to routing in the above controller are
@
Get
(
)
,
@
Post
(
)
,
Delete
(
)
, and
@
Put
(
)
. They tell Nest to create a handler for a specific endpoint for HTTP requests. The above controller creates a following set of endpoints:
Removes a post with a given id
By default, NestJS responds with a
200 OK
status code with the exception of
201 Created
for the POST.
We can easily change that
with the
@
HttpCode
(
)
decorator.
When we implement an API, we often need to refer to a specific element. We can do so with
route parameters
. They are special URL segments used to capture values specified at their position. To create a route parameter, we need to prefix its name with the
:
sign.
The way to extract the value of a route parameter is to use the
@
Param
(
)
decorator. Thanks to it, we have access to it in the arguments of our route handler.
We can use an optional argument to refer to a specific parameter, for example
@
Param
(
'id'
)
. Otherwise, we get access to the
params
object with all parameters.
Since route parameters are strings and our ids are number, we need to convert the params first.
We can also use
pipes
to transform the route params. Pipes are built-in feature in NestJS and we cover them later.
Accessing the body of a request
When we handle POST and PUT in the controller above, we also need to access the body of a request. By doing so, we can use it to populate our database.
NestJS provides a
@
Body
(
)
decorator that gives us easy access to the body. Just as in the
TypeScript Express series
, we introduce the concept of a Data Transfer Object (DTO). It defines the format of the data sent in a request. It can be either an interface or a class, but using the latter gives us more possibilities and we explore them later on.
createPost.dto.ts
By using the method argument decorators, we tell Nest to inject particular arguments into our methods. NestJS is built around the concept of Dependency Injection and Inversion of Control. We elaborate on in a lot as we go through various features.
An important note is that reversing their order yields the same result, which might seem counter-intuitive at first.
Advantages of NestJS over Express
NestJS gives us a lot of things out of the box and expects us to design our API using
controllers
. Express.js, on the other hand, leaves us more flexibility but does not equip us with such tools to maintain the readability of our code.
this
.
postsService
.
deletePost
(
Number
(
id
)
)
;
response
.
sendStatus
(
200
)
;
}
}
Above, we can see a similar controller created in pure Express. There are quite a few notable differences.
First, we need to handle the routing of the controller ourselves. We don’t have such convenient decorators that we can depend on to do it for us. The way NestJS works here resembles a bit the Spring Framework written for Java.
Another big advantage of NextJS is that it provides us with an elegant way of handling the
Request
and
Response
objects. Decorators such as
@
Body
(
)
and
@
Params
(
)
help to improve the readability of our code.
One of the most useful things Nest has to offer is how it handles responses. Our route handlers can return primitive types (for example, strings), promises, or even RxJS observable streams. We don’t need to handle it manually every time and use the
response
.
send
function. NestJS also makes it easy to handle errors in our application, and we explore it in the upcoming parts of this series.
When using NestJS, we can also manipulate the
Request
and
Response
objects directly. Handling responses ourselves strips us from some of the advantages of NestJS though.
There is also a difference in how we can handle dependencies in pure Express and NestJS.
In the above Express controller, we create a new
PostsService
directly in the
PostsController
. Unfortunately, it breaks the
Dependency inversion principle
from the SOLID principles. One of the issues that can cause is some trouble with writing tests.
NestJS, on the other hand, cares about compliance with the Dependency inversion principle a lot by implementing Dependency Injection.
Services
typescript
-
starter
repository also contains our first service. A job of a service is to separate the business logic from controllers, making it cleaner and more comfortable to test. Let’s create a simple service for our posts.
import
CreatePostDto
from
'./dto/createPost.dto'
;
import
Post
from
'./post.interface'
;
import
UpdatePostDto
from
'./dto/updatePost.dto'
;
@
Injectable
(
)
export
default
class
PostsService
{
private
lastPostId
=
0
;
private
posts:
Post
[
]
=
[
]
;
getAllPosts
(
)
{
return
this
.
posts
;
}
getPostById
(
id
:
number
)
{
const
post
=
this
.
posts
.
find
(
post
=
>
post
.
id
===
id
)
;
if
(
post
)
{
return
post
;
}
throw
new
HttpException
(
'Post not found'
,
HttpStatus
.
NOT_FOUND
)
;
}
replacePost
(
id
:
number
,
post
:
UpdatePostDto
)
{
const
postIndex
=
this
.
posts
.
findIndex
(
post
=
>
post
.
id
===
id
)
;
if
(
postIndex
>
-
1
)
{
this
.
posts
[
postIndex
]
=
post
;
return
post
;
}
throw
new
HttpException
(
'Post not found'
,
HttpStatus
.
NOT_FOUND
)
;
}
createPost
(
post
:
CreatePostDto
)
{
const
newPost
=
{
id
:
++
this
.
lastPostId
,
.
.
.
post
}
this
.
posts
.
push
(
newPost
)
;
return
newPost
;
}
deletePost
(
id
:
number
)
{
const
postIndex
=
this
.
posts
.
findIndex
(
post
=
>
post
.
id
===
id
)
;
if
(
postIndex
>
-
1
)
{
this
.
posts
.
splice
(
postIndex
,
1
)
;
}
else
{
throw
new
HttpException
(
'Post not found'
,
HttpStatus
.
NOT_FOUND
)
;
}
}
}
While the above logic is straightforward, there are a few noteworthy lines there.
We use the built-in
HttpException
class to throw errors that NestJS can understand. When we throw
HttpException
(
'Post not found'
,
HttpStatus
.
NOT_FOUND
)
, it gets propagated to the
global exception filter,
and a proper response is sent to the client. We explore this topic more in the upcoming parts of this series.
@
Injectable
(
)
decorator tells Nest that this class is a
provider
. Thanks to that, we can add it to a
module
.
Modules
We use modules to organize our application. Our
PostsController
and
PostsService
are closely related and belong to the same application domain. Therefore, it is appropriate to put them in a module together.
By doing so, we organize our code per feature. This is especially useful as our application grows.
posts.module.ts
Also, every application needs a
root module
. It is a starting point for Nest when building the application.
app.module.ts
controllers to instantiate
providers
providers to instantiate – they may be used at least across this module
exports
a subset of providers that are available in other modules
Summary
By doing all of the above, our
src
directory ends up like that:
1
2
3
4
5
6
7
8
9
10
11
├──
src
│
├──
app
.
module
.
ts
│
├──
main
.
ts
│
└──
posts
│
├──
dto
│
│
├──
createPost
.
dto
.
ts
│
│
└──
updatePost
.
dto
.
ts
│
├──
post
.
interface
.
ts
│
├──
posts
.
controller
.
ts
│
├──
posts
.
module
.
ts
│
└──
posts
.
service
.
ts
In this article, we’ve just got started with Nest. We’ve figured out what is a
Controller
and how to handle elementary routing in our application. We’ve also briefly touched the topic of
Services
and
Modules
. In the upcoming parts of this series, we will spend quite some time discussing the application structure in NestJS.
All of the above knowledge is just the tip of the NestJS iceberg. Hopefully, it convinces you that it is worth looking into this framework as it provides lots of value. There is a lot to say about features that Nest delivers, such as neat error handling and dependency injection. We will also look into the PostgreSQL database and how to use it both through ORM and SQL statements.
You can expect it in this series, and more, so stay tuned!
I strive to avoid pasting too much code. Although, this might be one of the important ones, good catch! I’ll add it to the article.
In
this repository
you can find The code from this series.
Here
you can see the interface you’ve mentioned.
Greetings Robert, it is not necessary to explictly name the return type of a function as Typescript will infer it automatically.
It’s not necessary, unless you want to do any operation on the resolved data, to return a resolved promise to the controller. This simply means that you can return a promise from the service to the controller, and immediately return this promise from the controller.
NestJS will handle this automatically: it will wait for the promise resolution and return its data outwards with as the response.
Of course, in a production application you will want to serialize this data with pagination and some other metadata. But as as POC, try this:
Return a promise from the controller immediately without await, and see how the data from it is returned in the response, even though you didn’t specifically awaited for it. You can even set a setTimeout with say 10 seconds within a fake Promise.resolve() object and see from postman how your request takes 10 seconds to be handled 🙂
Try it like this:
Hello, thank you a lot for this article, it allowed me to understand a lot at the initial stage. A very valuable resource!
Last edited 1 year ago by Rail
Thank you very much for this series. If im not mistaken there is a small issue in the PostService replacePost method, you update the content but override the id (the updated object will have no id).
Last edited 1 month ago by CASIO15
I want to receive the newsletter from wanago.io. I understand that my personal data will be processed according to the information in the
privacy policy
To provide the best experiences, we use technologies like cookies to store and/or access device information. Consenting to these technologies will allow us to process data such as browsing behavior or unique IDs on this site. Not consenting or withdrawing consent, may adversely affect certain features and functions.
Use the right ORM to work with SQL databases
It’s easy to make a wrong choice when selecting the ORM library to use with Node.js and a SQL database.
Download a free PDF to help you
choose the right tool for the job
.