小宇宙广场列表实现SquareLayoutManager


引言
在审美疲劳的当下,客户端单向滚动的列表 UI 大家已经司空见惯了。在小宇宙 App 的某次需求中,设计师给出了一个大胆且让人眼前一亮的列表设计方案。设计原图如下:

看到 UI 需求的那一刻,我是头秃的,同时也激发了我的挑战心,下面带着大家一起从零开始写一个优美的广场列表 UI。如果你感兴趣如何直接使用,可移步至开源地址查看 README 详情: GitHub 。
实现思路以及功能特点如下:
-
不固定个数的列表 UI,首选
RecyclerView实现,布局使用自定义LayoutManager -
通过自定义
SnapHelper实现惯性运动,以及滑动后最靠近中心位置的 Item 自动居中 - 滑动过程中,有大小变化,卡片离中心越远越小
-
纯
Kotlin代码实现
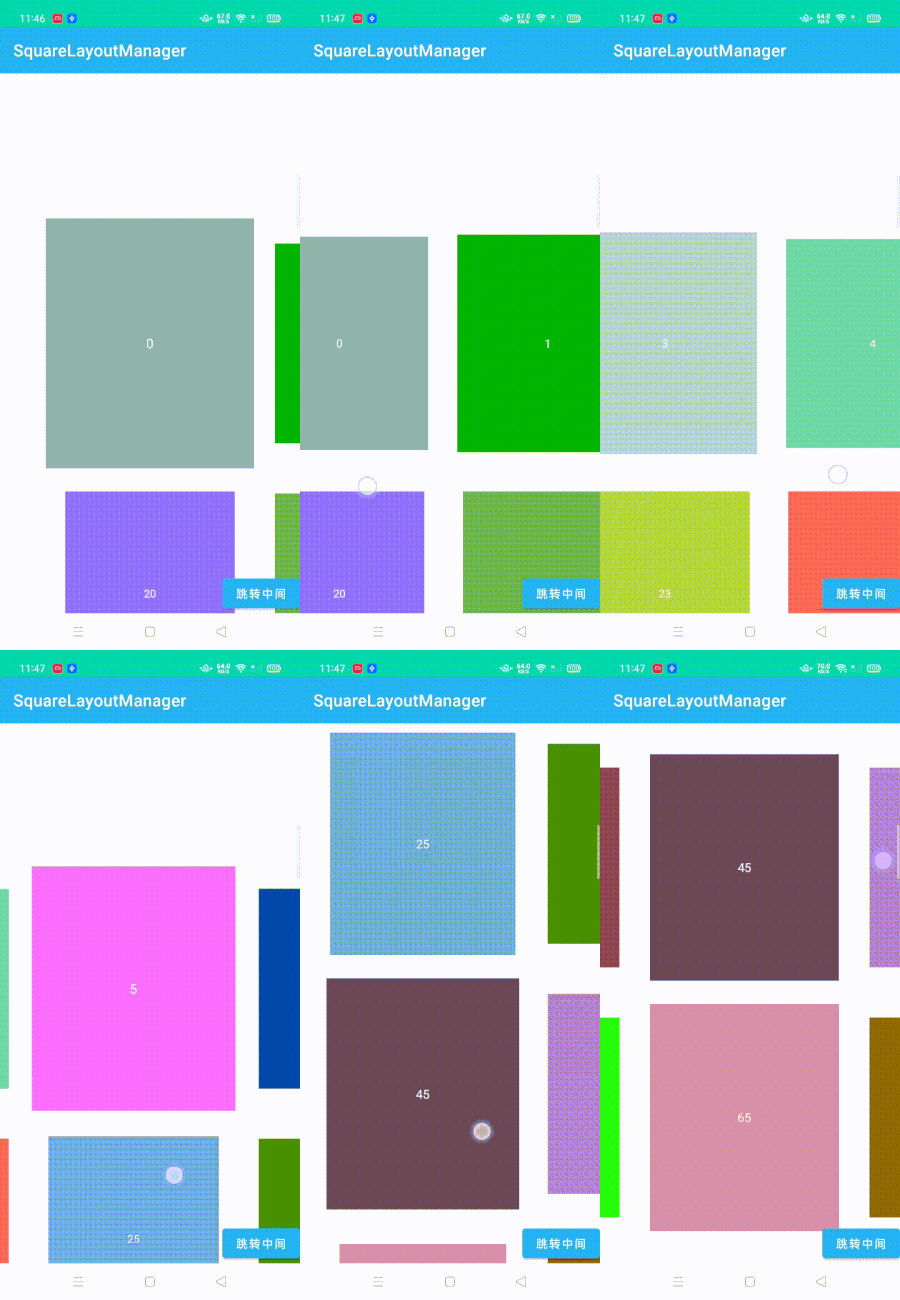
在讲解代码实现前,先来看看小宇宙 App 中的实现效果图:

自定义 LayoutManager
自定义
LayoutManger
的主要步骤有添加子 View、测量、布局、处理滑动以及回收,这个过程中的重点就是布局,涉及到的方法如下:
-
onLayoutChildren():初始化或Adapter更新时上层自动调用 -
layoutDecorated(view, left, top, right, bottom):测量好各参数后,调用该方法进行布局绘制 -
layoutDecoratedWithMargins():与上面方法作用相同,但会计算 Margin 值
下面带着大家从零开始实现一个自定义的
LayoutManager
,首先写一个继承自
RecyclerView.LayoutManager
的类:
class SquareLayoutManager @JvmOverloads constructor(val spanCount: Int = 20) : RecyclerView.LayoutManager() {
  private var verScrollLock = false
  private var horScrollLock = false
  override fun generateDefaultLayoutParams(): RecyclerView.LayoutParams {
        return RecyclerView.LayoutParams(
            RecyclerView.LayoutParams.WRAP_CONTENT,
            RecyclerView.LayoutParams.WRAP_CONTENT
  override fun canScrollHorizontally() = horScrollLock.not()
  override fun canScrollVertically() = verScrollLock.not()
}-
构造函数中的
spanCount为一行元素的个数,默认 20 -
generateDefaultLayoutParams()为必须实现的抽象方法,用于布局参数中携带自定义的属性,这里没有特殊需求一般使用WRAP_CONTENT -
重写的
canScrollHorizontally()与canScrollVertically()方法表示是否可以横向或竖向滑动,这里的需求是两个方向都可以滑动,为了避免冲突写了两个 Lock 属性进行判断
接下来是初始化布局的实现,需要重写
onLayoutChildren()
方法,这个方法会在初始化或者
Adapter
数据更新时调用,实现如下:
override fun onLayoutChildren(recycler: RecyclerView.Recycler, state: RecyclerView.State) {
    if (state.itemCount == 0) {
        removeAndRecycleAllViews(recycler)
        return
    // 下面两个属性表示横纵方向上 从一个 item 滑动到下一个 item 所需要经过的距离,用于起始坐标的计算
    onceCompleteScrollLengthForVer = -1f
    onceCompleteScrollLengthForHor = -1f
    detachAndScrapAttachedViews(recycler)
    // 布局核心方法
    onLayout(recycler, 0, 0)
}
在进行布局前,调用
detachAndScrapAttachedViews()
方法把所有的 View 先从
RecyclerView
中 detach 掉,再标记为
Scrap
状态,表示这些 View 处于可被重用状态。最后调用到的
onLayout(recycler, 0, 0)
方法为本次布局的重点方法,定义如下:
fun onLayout(recycler: RecyclerView.Recycler, dx: Int, dy: Int): Point
方法参数中的
dx
与
dy
为一次手指滑动所偏移的像素值,用于处理滑动的计算,
LayoutManager
中处理手指在横竖方向上滑动的两个方法为:
scrollHorizontallyBy()
与
scrollVerticallyBy()
,需要子类自己实现滑动的处理,子类最终返回的值就是真实的滑动距离,实现如下:
override fun scrollHorizontallyBy(
    dx: Int,
    recycler: RecyclerView.Recycler,
    state: RecyclerView.State
): Int {
    if (dx == 0 || childCount == 0) {
        return 0
    verScrollLock = true
    // 全局记录横坐标的移动距离
    horizontalOffset += dx
    // 滑动过程中的布局,以及返回最终的实际滑动距离
    return onLayout(recycler, dx, 0).x
// ... 此处省略竖直方向的 scrollHorizontallyBy() 方法代码,与上方横向逻辑一致
接下来,就到了布局绘制最重要的方法
onLayout()
,该方法作用如下:
- 计算实际滑动距离
- 计算可见 Item 坐标
- 布局测量与绘制
- Item 缩放大小计算
其实,该方法计算的本质就是通过已知数求解未知数,这里的已知数为屏幕宽高、Item 宽高、总的滑动距离、本次滑动距离,未知数为左上角第一个起始 Item 的坐标、当前屏幕中的所有可见 Item 的坐标以及 item 的缩放大小。
在看计算的具体实现之前,先来看看下图的辅助说明:

上图所示的
firstChildCompleteScrollLengthForHor
与
onceCompleteScrollLengthForHor
都是可直接计算得到的值,用于辅助计算可见 item 的坐标位置,下面来看看具体的计算过程:
// 计算横坐标上第一个 item 滑动到不可见时所需要的距离
firstChildCompleteScrollLengthForHor = width / 2f + childWidth / 2f
// 当横向的滑动距离超过第一个 item 滑动到不可见所需的距离时
if (horizontalOffset >= firstChildCompleteScrollLengthForHor) {
    horStart = 0f
    // 一次完整的卡片切换滑动所需要的距离
    onceCompleteScrollLengthForHor = childWidth.toFloat()
    // 计算横向上第一个可见 Item 的 position
    firstVisiblePosForHor =
        floor(abs(horizontalOffset - firstChildCompleteScrollLengthForHor) / onceCompleteScrollLengthForHor.toDouble()).toInt() + 1
    // 用于校正 horStart 值
    normalViewOffsetForHor =abs(horizontalOffset - firstChildCompleteScrollLengthForHor) % onceCompleteScrollLengthForHor
} else {
    // 当横向的第一个 item 一直可见时,该方向上的 firstVisiblePos 为 0
    firstVisiblePosForHor = 0
   // horizontalMinOffset = if (childHeight == 0) 0f else (height - childHeight) / 2f,表示横向上未滑动时,第一个 item 的 left 值
    horStart = horizontalMinOffset
    // 计算横向上,一次完整的卡片切换滑动所需要的移动距离,该方向上第一个 item 可见时,该值为 height / 2f + childHeight / 2f
    onceCompleteScrollLengthForHor = firstChildCompleteScrollLengthForHor
    normalViewOffsetForHor = abs(horizontalOffset) % onceCompleteScrollLengthForHor
}
在经过计算后,就得到了横坐标上用于计算可见 Item 坐标的辅助参数,纵坐标上的计算逻辑与此相同,就不过多阐述了。在分别得到了横纵坐标上第一个可见 item 的 position 值后,就可以计算出在二维矩阵上的第一个可见 item 的 position 值以及该 item 的左上角
left
与
top
坐标值,计算代码如下:
firstVisiblePos = firstVisiblePosForVer * spanCount + firstVisiblePosForHor
// 用于校正 verStart 与 horStart 值
verStart -= normalViewOffsetForVer
horStart -= normalViewOffsetForHor
val left = horStart.toInt()
val top = verStart.toInt()
最后会循环遍历每一个可见 Item,并计算绘制出该 ItemView,具体实现如下:
var index = firstVisiblePos
while (index != -1) {
    val item = if (index == tempPosition && tempView != null) {
        tempView
    } else {
        recycler.getViewForPosition(index)
    val focusPositionForVer =
        (abs(verticalOffset) / childHeight).toInt()
    val focusPositionForHor =
        (abs(horizontalOffset) / childWidth).toInt()
    // 计算最靠近中心的 item position
    val focusPosition = focusPositionForVer * spanCount + focusPositionForHor
    // 判断 addView 时的层级,不过暂时没有重叠 Item 的情况,这里也可以直接 addView(item)
    if (index <= focusPosition) {
        addView(item)
    } else {
        addView(item, 0)
    // 测量 ItemView
    measureChildWithMargins(item, 0, 0)
    val left = horStart.toInt()
    val top = verStart.toInt()
    val right = left + getDecoratedMeasurementHorizontal(item)
    val bottom = top + getDecoratedMeasurementVertical(item)
    // ... 计算并处理缩放大小
    // 绘制 ItemView
    layoutDecoratedWithMargins(item, left, top, right, bottom)
    // ... 此处省略的代码主要用于计算下一个可见 item 的 index 值,以及判断是否需要终止 while 循环,感兴趣可去源码查看
}
在绘制 ItemView 之前,会进行缩放处理,也就是上方代码中的第一处省略逻辑,代码如下:
val minScale = 0.8f
// 当 item 处于屏幕的正中心时缩放大小为1,距离中心越远值越小
val childCenterY = (top + bottom) / 2
val parentCenterY = height / 2
val fractionScaleY = abs(parentCenterY - childCenterY) / parentCenterY.toFloat()
val scaleX = 1.0f - (1.0f - minScale) * fractionScaleY
val childCenterX = (right + left) / 2
val parentCenterX = width / 2
val fractionScaleX = abs(parentCenterX - childCenterX) / parentCenterX.toFloat()
val scaleY = 1.0f - (1.0f - minScale) * fractionScaleX
// 取较小的缩放值,但最多缩放 0.8
item.scaleX = max(min(scaleX, scaleY), minScale)
item.scaleY = max(min(scaleX, scaleY), minScale)
至此,我们初步实现了一个带缩放效果的二维矩阵列表,来看下效果:

可以看出,列表的基本绘制已经没有问题了,但缺少了点丝滑,需要在滑动松手后继续随着惯性运动滑一会儿,并且自动选择滑动后最靠近中心的 Item 停在中间。好在官方源码中有提供类似的滑动辅助类:
SnapHelper
。
自定义 SnapHelper
SnapHelper
类是由官方提供的辅助类,用于
RecyclerView
滚动结束时通过惯性将某个 Item 对齐到固定位置上。官方源码提供了两种实现:
LinearSnapHelper
、
PagerSnapHelper
,但都不适用于上面的二维矩阵列表,所以需要仿造源码自定义一个
SnapHelper
。
首先,来看看官方的
SnapHelper
提供的三个抽象方法定义:
-
findTargetSnapPosition(LayoutManager layoutManager, int velocityX, int velocityY) -
根据触发 fling 操作的速率(参数
velocityX和velocityY)来计算出RecyclerView需要滚动到的最终位置
-
findSnapView(LayoutManager layoutManager) -
找到当前
LayoutManager上最靠近对齐位置的 ItemView
-
calculateDistanceToFinalSnap(LayoutManager layoutManager, View targetView) - 根据第二个参数对应的 ItemView 的当前坐标,计算出该坐标与需要对齐的坐标之间的距离,主要用于滑动
参照官方
SnapHelper
,写一个继承自
RecyclerView.OnFlingListener()
的类,同时实现抽象方法
onFling()
,并实现入口方法
attachToRecyclerView()
,代码如下:
class SquareSnapHelper : RecyclerView.OnFlingListener() {
    private var mRecyclerView: RecyclerView? = null
    override fun onFling(velocityX: Int, velocityY: Int): Boolean {
        val layoutManager = mRecyclerView?.layoutManager ?: return false
        // 仿造官方实现,获取 fling 操作需要的最小速率,只有超过该速率,Item 才有动力滑下去
        val minFlingVelocity = mRecyclerView?.minFlingVelocity ?: return false
        // 这里会调用snapFromFling()这个方法,就是通过该方法实现平滑滚动并使得在滚动停止时itemView对齐到目的坐标位置
        return ((abs(velocityY) > minFlingVelocity || abs(velocityX) > minFlingVelocity) && snapFromFling(
            layoutManager,
            velocityX,
            velocityY
    // 入口方法,绑定 RecyclerView 以及初始化
    fun attachToRecyclerView(recyclerView: RecyclerView?) {
        if (mRecyclerView === recyclerView) {
            return
        if (mRecyclerView != null) {
            destroyCallbacks()
        mRecyclerView = recyclerView
        recyclerView?.let {
            // 创建一个 Scroller,用于辅助计算 fling 的滑动总距离
            mGravityScroller = Scroller(
                it.context,
                DecelerateInterpolator()
            setupCallbacks()
    private fun setupCallbacks() {
        check(mRecyclerView?.onFlingListener == null) { "An instance of OnFlingListener already set." }
        // 添加 ScrollListener 监听,用于确保停止的位置是在正确的坐标上,主要是 fling 滑动停止后稍微校正下
        mRecyclerView?.addOnScrollListener(mScrollListener)
        mRecyclerView?.onFlingListener = this
}
其中,
onFling()
方法会在滑动过程中手指抬起的那一刻被调用,用于处理后续的惯性计算与滑动,该方法最终调用到的
snapFromFling()
方法,实现了惯性计算以及滑动处理,实现如下:
private fun snapFromFling(layoutManager: RecyclerView.LayoutManager, velocityX: Int, velocityY: Int): Boolean {
    // 判断 LayoutManager 必须是上面的 SquareLayoutManager
    if (layoutManager !is SquareLayoutManager) {
        return false
    // 通过 findTargetSnapPosition() 方法,以 layoutManager 和速率作为参数,找到targetSnapPosition
    val targetPosition: Int =
        findTargetSnapPosition(layoutManager, velocityX, velocityY)
    if (targetPosition == RecyclerView.NO_POSITION) {
        return false
    // 利用 SquareLayoutManager 的 smoothScrollToPosition 方法,平滑的滚动到目标位置
    layoutManager.smoothScrollToPosition(targetPosition)
    return true
}
可以看出,惯性滑动后的目标位置是通过
findTargetSnapPosition()
方法计算所得。到这,也就到了自定义
SnapHelper
的核心方法
findTargetSnapPosition()
的实现了,该方法用于计算滑动后的最终停止位置,代码如下:
private fun findTargetSnapPosition(layoutManager: RecyclerView.LayoutManager, velocityX: Int, velocityY: Int): Int {
    // ... 省略部分无关紧要的判断与变量初始化代码
    // 找到当前最靠近中心的 item
    val currentView = findSnapView(layoutManager) ?: return RecyclerView.NO_POSITION
    val currentPosition = layoutManager.getPosition(currentView)
    // 估算 fling 结束时相对于当前 snapView 位置的横向位置偏移量(单位:个数)
    var hDeltaJump =
        if (layoutManager.canScrollHorizontally() && ((abs(velocityY) - abs(velocityX)) > 4000).not()) {
            estimateNextPositionDiffForFling(
                layoutManager,
                getHorizontalHelper(layoutManager), velocityX, 0
        } else {
    val currentHorPos = currentPosition % spanCount + 1
    // 处理二维矩阵的边界问题
    hDeltaJump = when {
        currentHorPos + hDeltaJump >= spanCount -> {
            abs(spanCount - currentHorPos)
        currentHorPos + hDeltaJump <= 0 -> {
            -(currentHorPos - 1)
        else -> {
            hDeltaJump
    // 校正,最多滑动三个 item
    hDeltaJump = if (hDeltaJump > 0) min(3, hDeltaJump) else max(-3, hDeltaJump)
    // ... 此处省略估算竖向偏移量 hDeltaJump 的计算代码,与上方横向逻辑一致
    // 相对于当前最中心的 item,最终需要偏移的 item 个数
    val deltaJump = hDeltaJump + vDeltaJump * spanCount
    if (deltaJump == 0) {
        return RecyclerView.NO_POSITION
    // 得到最终目标的 position
    var targetPos = currentPosition + deltaJump
    if (targetPos < 0) {
        targetPos = 0
    if (targetPos >= itemCount) {
        targetPos = itemCount - 1
    return targetPos
}
findTargetSnapPosition()
首先会找到当前最靠近屏幕中心的
SnapView
,再通过
estimateNextPositionDiffForFling()
相关方法估算出惯性滑动后的位置偏移量,最后通过
SnapView
的
position
加上位置偏移量,得出最终滚动结束时的位置。其中
estimateNextPositionDiffForFling()
方法实现如下:
private fun estimateNextPositionDiffForFling(
    layoutManager: RecyclerView.LayoutManager,
    helper: OrientationHelper, velocityX: Int, velocityY: Int
): Int {
    // 计算滚动的总距离,这个距离受到触发 fling 时的速度的影响
    // calculateScrollDistance() 方法主要是用 mGravityScroller 的 fling() 方法模拟惯性滑动
    val distances = calculateScrollDistance(velocityX, velocityY) ?: return -1
    // 计算每个 item 的高度或宽度
    val distancePerChild = computeDistancePerChild(layoutManager, helper)
    if (distancePerChild <= 0) {
        return 0
    // 判断是横向布局还是纵向布局,来取对应布局方向上的滚动距离
    val distance =
        if (abs(distances[0]) > abs(distances[1])) distances[0] else distances[1]
    // 滚动距离 / item的长度 = 滚动 item 的个数,这里取计算结果的整数部分
    return (distance / distancePerChild).roundToInt()
}
在计算出最终停留位置后,需要进行滑动处理,回到上面
snapFromFling()
方法的最后,滑动处理是通过刚刚的自定义
SquareLayoutManager
的
smoothScrollToPosition()
方法实现的,下面我们来看看该动画的核心实现代码:
ValueAnimator.ofFloat(0.0f, duration.toFloat()).apply {
    // 根据滑动距离计算动画运动时长,具体计算代码可查看源码
    this.duration = max(durationForVer, durationForHor)
    // 动画使用减速插值器
    interpolator = DecelerateInterpolator()
    val startedOffsetForVer = verticalOffset.toFloat()
    val startedOffsetForHor = horizontalOffset.toFloat()
    // 运动过程中刷新画面
    addUpdateListener { animation ->
        val value = animation.animatedValue as Float
        verticalOffset =
            (startedOffsetForVer + value * (distanceForVer / duration.toFloat())).toLong()
        horizontalOffset =
            (startedOffsetForHor + value * (distanceForHor / duration.toFloat())).toLong()
        requestLayout()
    doOnEnd {
        if (lastSelectedPosition != position) {
            // 回调 onItemSelectedListener
            onItemSelectedListener(position)
            lastSelectedPosition = position